Controller > choose texts
Type of text files
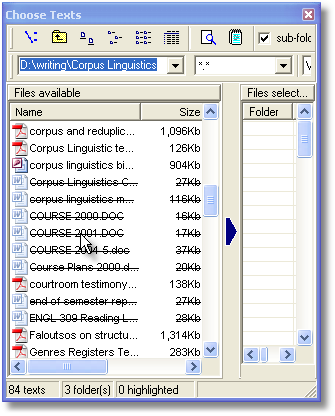
In WordSmith you need plain text files, such as you get if you save a Word .doc as Plain Text (.txt). Any Word .doc files will look crossed out. Don't choose .pdfs, they have a very special format.
How to get here
This function is accessed from the File menu in the Controller and the Settings menu or New menu item (![]() ) in the various Tools.
) in the various Tools.
The two main areas at left and right are
| • | files to choose from (at left) |
| • | files already selected (at right) |
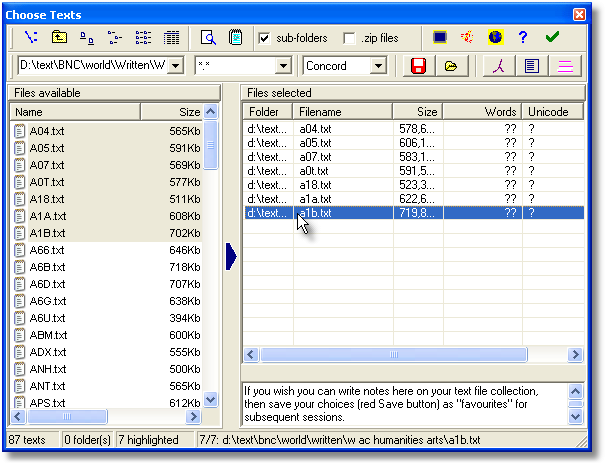
The big blue arrow is where you press to move any you have selected at the left to your "files selected" at the right. Or just drag them from the left to the right.
The list on the right shows full file details (name, date, size, number of words (above shown with ?? as WordSmith doesn't yet know, though it will after you have concordanced or made a word list) and whether the text is in Unicode (? for the same reason). To the right of Unicode is a column stating whether each text file meets your requirements.
The buttons at the top left let you see the files available as icons, as a list, or with full details (the default) instead.
If you have never used WordSmith before (more precisely if you have not yet saved any concordances, word lists etc.) you will find that a chapter from Charles Dickens' Tale of 2 Cities has been selected for you. To stop this happening, make sure that you do save at least one word list or concordance! See also -- previous lists.
File Types
The default file specification is *.* (i.e. any file) but this can be altered in the window above the big blue arrow or set permanently in wordsmith.ini.
Tool
In the screenshot above you can see "Concord" -- we are choosing texts for Concord. There are alternatives available (WordList, KeyWords etc.).
Sorting
By clicking on Name, Size, Type, Words, Unicode or Modified you can re-sort the listing. The red and yellow button (![]() ) re-orders the files (on both sides) in random order.
) re-orders the files (on both sides) in random order.
Select All ![]()
Selects all the files in the current folder.
Drives and Folders
Double-click on a folder to enter it. You can re-visit a folder if its name is in the folder window history list, and easily go back with the standard Windows "back" button ![]() . Or click on the
. Or click on the ![]() button to choose a new drive or folder.
button to choose a new drive or folder.
Sub-Folders
If checked, when you select a whole driveful or a whole folderful of texts at the left, you will select it plus any files in any sub-folders of that drive or folder.
View ![]()
Allows you to browse within the currently selected file so as to check whether to include it. Any accented characters (e.g. æ, é) or currency symbols such as £, ¥, ¢, and tags will appear according to current Text Characteristics settings. You can change these while viewing the file.
View in Notepad ![]()
Lets you see the text contents in the standard Windows simple word-processor for text files, Notepad.
Get from Internet ![]()
Allows you to access WebGetter so as to download text from the Internet.
Zip files
If you double-click on a zip file you can enter that as if it were a folder and see the contents. You can view these too.
Two buttons on the right (![]() and
and ![]() ) allow you to save or get a previous file selection, saving you the trouble of making and remembering a complex set of choices.
) allow you to save or get a previous file selection, saving you the trouble of making and remembering a complex set of choices.
Test for Unicode ![]()
This button tests any files selected. In the screenshot above, no tests have been done so the display shows ? for each file. If the text file is in Unicode, the display shows U, if plain ASCII or Ansi text, if it's a Word .doc file, D.
Clear ![]()
As its name suggests, this allows you to change your mind and start afresh. If any selected filenames are highlighted, only these will be cleared.
OK ![]()
This puts the current file selection into store. All files of the type you've specified in any sub-folders will also get selected if the "Sub-folders too" checkbox is checked.
You can check on which ones have been selected under All Current Settings.
See also : Step-by-step online example, Finding source texts.